Create a class type for Z-objects in SAP
Step-by-step guide to integrating SAP classification with custom Z-tables. Learn how to create class types, object keys, and function modules for effective object classification.
For a recent project, we were required to link the classification system to entries in a custom Z-table. To make it easier to understand, I’ve simplified the table structure and excluded non-essential fields, leaving only the primary key.
📘 1. Z-Table Definition
Table: ZPLANNING_BATCH
-
Fields:
- MANDT (MANDT)
- ZZBATCH_ID (ZPLANNING_BATCH_ID)
Data Element:
- ZPLANNING_BATCH_ID:
- Domain: ZPLANNING_BATCH_ID
Domain:
- ZPLANNING_BATCH_ID:
- Data Type: NUMC
- Length: 10
- Conversion Exit: Alpha
- Value Table: ZPLANNING_BATCH
🧩 2. Create an Object Key for Your Z-Table
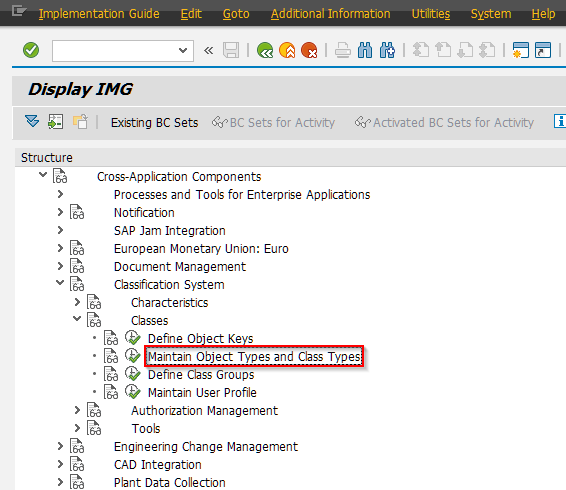
Once the table is created, go to transaction SPRO and navigate to: Cross-Application Components -> Classification System -> Classes -> Define Object Keys.

Here, you can create a new entry for your Z-table and provide all the necessary details, such as the transaction code for maintaining objects from your table, the table name itself, the text table, and the key fields.
If you are using non-standard SAP fields (such as ZZBATCH_ID in this case), you’ll need to append these fields to the RMCLF structure. For more information, refer to SAP Note 2419619.
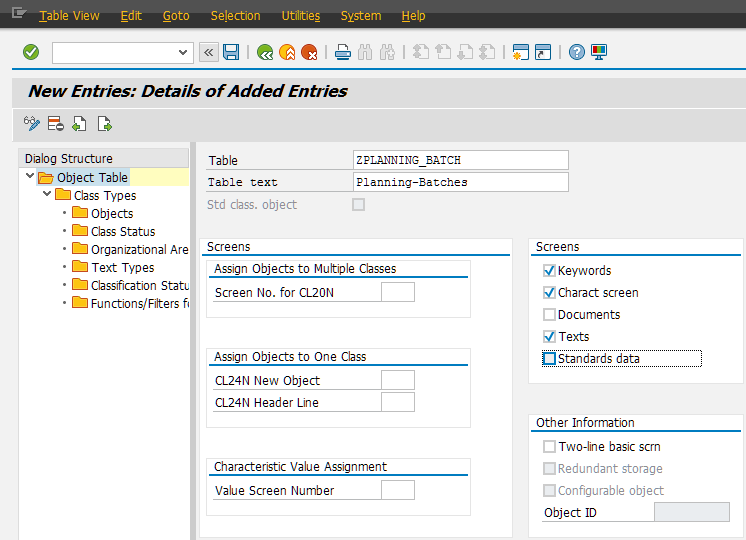
🗂️ 3. Adding the Object Table
You can add an object table either via transaction O1CL or through SPRO (Cross-Application Components -> Classification System -> Classes -> Maintain Object Types and Class Types).
Add a new entry under the “Object Table” node, specifying the Z-table name, a description, and any relevant screens. Below is an example of the configuration:
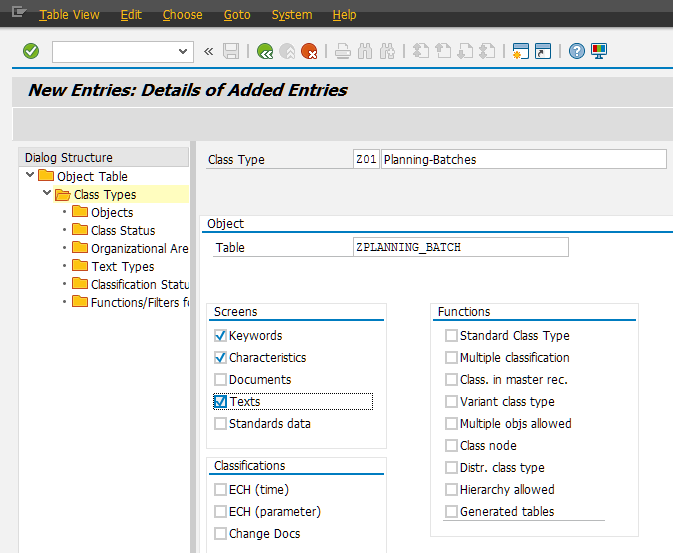
🧱 4. Add a New Class Type
Using the same transaction, you can add a new class type for your Z-table. Choose the entry you created in step 3, select the “Class Types” node, and create a new entry. On this screen, you can define the class type name, the object table, and the required screens.
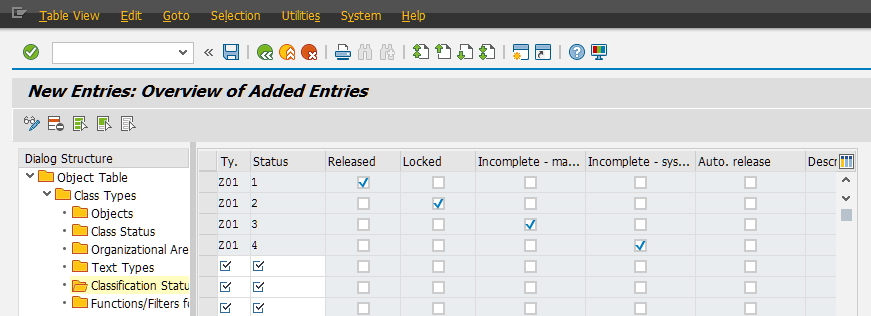
🛠️ 5. Maintain the Class/Classification Status
Before you can save your changes, you need to set the classification status. You can configure this under the “Class Status” and “Classification Status” nodes, entering the desired status values. Below are the settings I used:
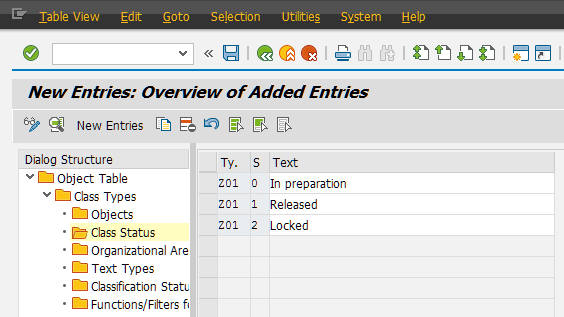
Here are the details for each status:
-
Status 0 (In Preparation)
- Class maintenance: Checked
-
Status 1 (Released)
- Class maintenance: Checked
- Classification: Checked
- Selection: Checked
- Default status: Checked
-
Status 2 (Locked)
- Class maintenance: Checked
- Selection: Checked
🧮 6. Creating the Function Module OBJECT_CHECK_[Object Type Name]
To use classification for your objects, you need to create a function module named OBJECT_CHECK_[Object Type Name]. This function module will be called dynamically, so ensure that the name matches the object type name.
For this, I recommend copying an existing function module, such as OBJECT_CHECK_MARA, and adapting it to your needs. Be sure not to change the interface of the function module.
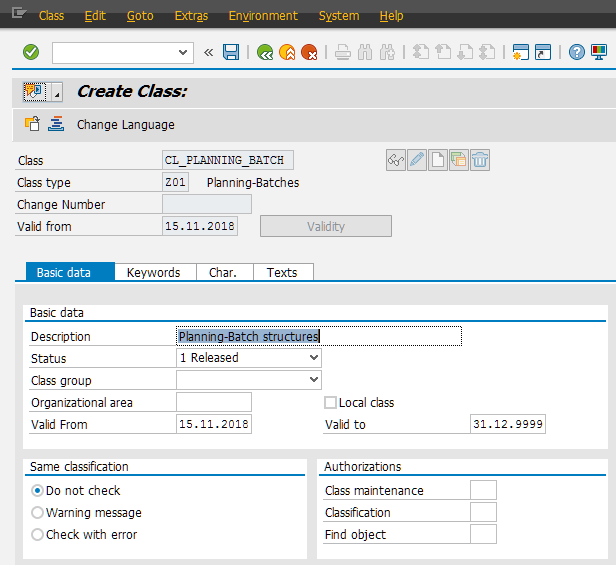
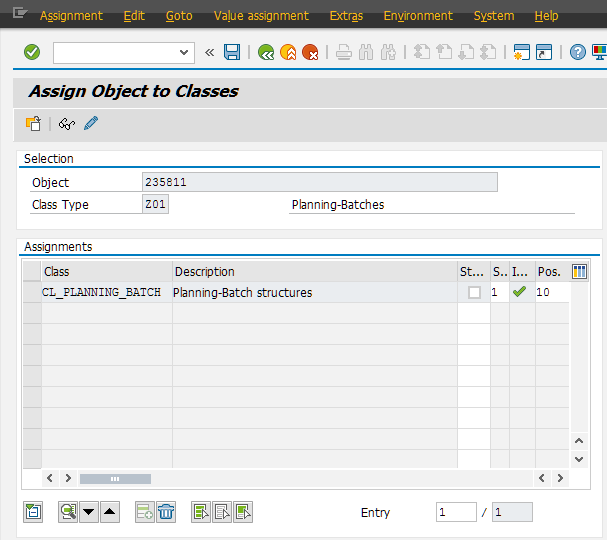
Once you’ve completed these steps, you should be able to create a class for your class type using transaction CL02 and classify objects with transaction CL20N:
🧠 Final Thoughts
By following these steps, you can successfully integrate the classification system with your custom Z-table entries. This process helps ensure that your SAP system is properly organized and that you can classify your objects effectively. If you’re working on a similar integration, I hope this guide provides the clarity you need to proceed with confidence.